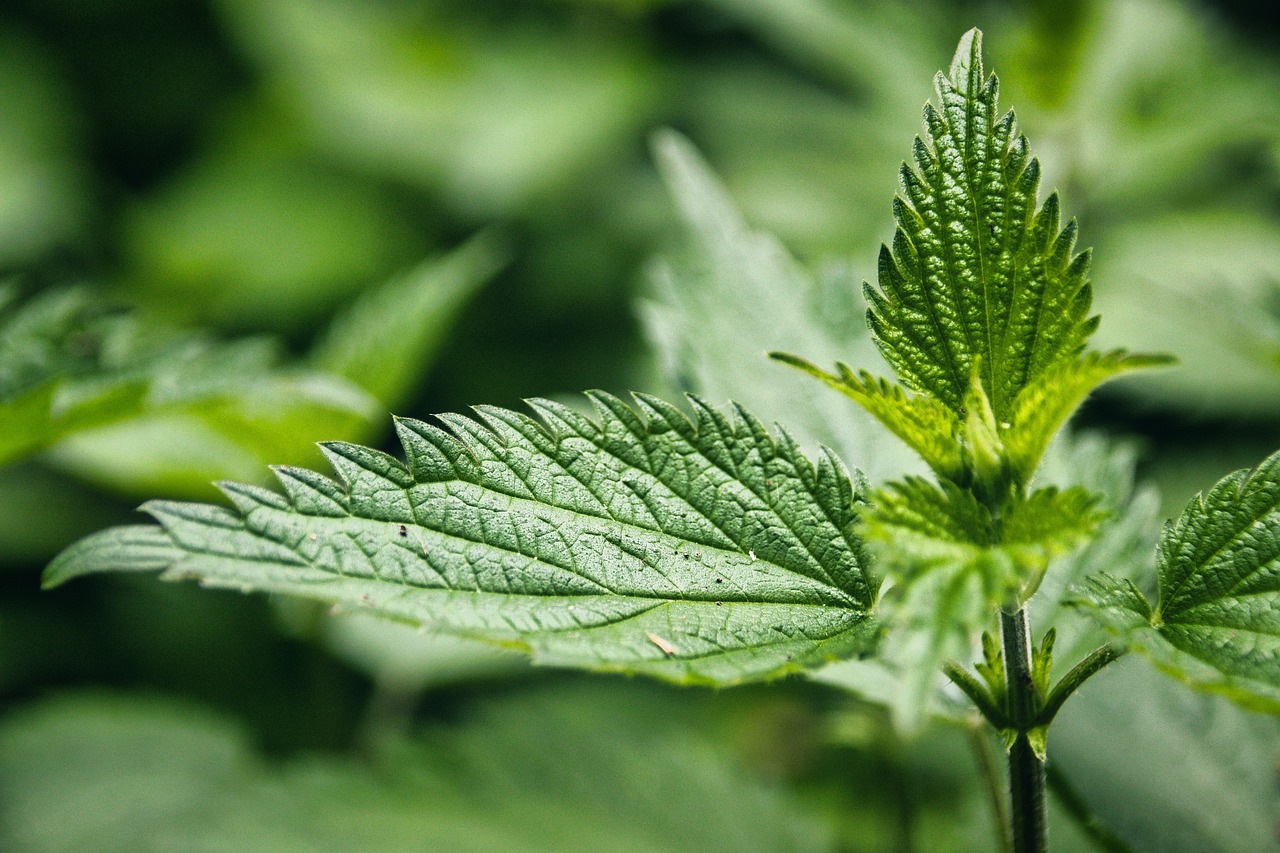
Posted on

Löwenzahn – Notizen

Löwenzahn is vor allem auch für Menschen Interessant, die keinen Garten haben. Einmal im Topf kann man die Blätter und Wurzeln immer wieder ernten. Ein kleines Stück Wurzel reicht aus, um wieder auszutreiben. Er ist sozusagen “unendliche Versorgung mit gesundem Grün”.

Image by NoName_13 from Pixabay

Posted on

​Lavorare a maglia i guanti (1)

Devo ancora migliorare questa versione in lingua italiana. In questi giorni ho pocchissimo tempo e quindi ho fatto il meglio possibile nel tempo che ho.

Questo ti serve

  • Ferri per lavorare a maglia in tondo: un set di 5 ferri, da 4 a 4,5 mm
  • Ferri per riprendere i punti: un set di 4 o 5 ferri da 2 a 2,5 mm.
  • Filato per lavorare a maglia con ferri da 4 a 4,5 mm
  • Ago da cucito
  • Forbici

Se un’istruzione non è chiara, fatemelo sapere e provvederò a migliorare la descrizione. Quando si lavora sempre a maglia, spesso ci sono passaggi ovvi per chi ha esperienza che non sono affatto ovvi per altri. Il video di YouTube è integrato di seguito.

​Guanto destro

  • Avviare 40 maglie (10 per ogni ferro, 20 su due ferri)
  • Distribuire le maglie: 12 maglie su ferro 1 e 3, 8 maglie su ferro 2 e 4
  • Lavorare in tondo 2 maglie diritte e 2 maglie rovescie, fino a completare 34 giri.
  • Distribuire le maglie: 10 maglie su ogni ferro
  • Lavorare 17 giri (la quantità di giri qui dipende in realtà da come ti piacciono i tuoi guanti)
  • A questo punto iniziamo con gli aumenti per il pollice
  • Giro 1: primo ferro: lavorare 1 maglia (tutte le maglie diritte), lavorare 1 + aumento, lavorare 1 + aumento, finire di lavorare il giro.
  • Giro 2: primo ferro: lavorare 1 maglia diritta, lavorare 1 + aumento, lavorare 2, lavorare 1 + aumento, finire di lavorare il giro.
  • Giro 3: primo ferro: lavorare 1 maglia diritta, lavorare 1 + aumento, lavorare 4, lavorare 1 + aumento, finire di lavorare il giro.
  • Giro 4: primo ferro: lavorare 1 maglia diritta, lavorare 1 + aumento, lavorare 6, lavorare 1 + aumento, finire di lavorare il giro.
  • Giro 5: lavorare questo giro senza aumenti
  • Giro 6: primo ferro: lavorare 1 maglia diritta, lavorare 1 + aumento, lavorare 8, lavorare 1 + aumento, finire di lavorare il giro.
  • Giro 7: lavorare questo giro senza aumenti
  • Giro 8: primo ferro: lavorare 1 maglia diritta, lavorare 1 + aumento, lavorare 10, lavorare 1 + aumento, finire di lavorare il giro.
  • Giro 9: 1° ferro: lavorare 2 maglie, distribuire i 13 punti degli aumenti su due spille da sicurezza, aumentare 1 punto, terminare il giro.
  • Continuare a lavorare a maglia fino ad aver completato 40 giri dalle coste (2 dir 2 rov)
  • Distribuire le maglie: 12 maglie su ferro 1 e 3, 8 maglie su ferro 2 e 4
  • Lavorare 2, diritte e 2 rovescie per 5 giri
  • Chiudere le maglie
  • Lavorare a maglia il pollice:
  • Passare i punti delle 2 spille di sicurezza sui 2 ferri sottili e riprendere 5 punti con un terzo ferro sottile.
  • Lavorare un giro distribuendo uniformemente le 18 maglie
  • Fare a maglia 6 giri “1 diritto, 1 rovescio”
  • Chiudere le maglie
  • Ricucire i fili

​Guanto sinistro

  • Avviare 40 maglie (10 per ogni ferro, 20 su due ferri)
  • Distribuire le maglie: 12 maglie su ferro 1 e 3, 8 maglie su ferro 2 e 4
  • Lavorare in tondo 2 maglie diritte e 2 maglie rovescie, fino a completare 34 giri.
  • Distribuire le maglie: 10 maglie su ogni ferro
  • Lavorare 17 giri (la quantità di giri qui dipende in realtà da come ti piacciono i tuoi guanti)
  • A questo punto iniziamo con gli aumenti per il pollice
  • Giro 1: lavorare a maglia (diritta) il primo ferro, secondo ferro: lavorare 6 maglie diritte, lavorare 1 + aumento, lavorare 1 + aumento, finire di lavorare il giro.
  • Giro 2: lavorare a maglia (diritta) il primo ferro, secondo ferro: lavorare 6 maglie diritte, lavorare 1 + aumento, lavorare 2, lavorare 1 + aumento, finire di lavorare il giro.
  • Giro 3: lavorare a maglia (diritta) il primo ferro, secondo ferro: lavorare 6 maglie diritte, lavorare 1 + aumento, lavorare 4, lavorare 1 + aumento, finire di lavorare il giro.
  • Giro 4: lavorare a maglia (diritta) il primo ferro, secondo ferro: lavorare 6 maglie diritte, lavorare 1 + aumento, lavorare 6, lavorare 1 + aumento, finire di lavorare il giro.
  • Giro 5: lavorare questo giro senza aumenti
  • Giro 6: lavorare a maglia (diritta) il primo ferro, secondo ferro: lavorare 6 maglie diritte, lavorare 1 + aumento, lavorare 8, lavorare 1 + aumento, finire di lavorare il giro.
  • Giro 7: lavorare questo giro senza aumenti
  • Giro 8: lavorare a maglia (diritta) il primo ferro, secondo ferro: lavorare 6 maglie diritte, lavorare 1 + aumento, lavorare 10, lavorare 1 + aumento, finire di lavorare il giro.
  • Giro 9: lavorare a maglia (diritta) il primo ferro, secondo ferro: lavorare 7 maglie diritte, distribuire le 13 maglie dell’aumento su due spille di sicurezza, aumentare 1, finire di lavorare il giro.
  • Continuare a lavorare a maglia fino ad aver completato 40 giri dalle coste (2 dir 2 rov)
  • Distribuire le maglie: 12 maglie su ferro 1 e 3, 8 maglie su ferro 2 e 4
  • Lavorare 2, diritte e 2 rovescie per 5 giri
  • Chiudere le maglie
  • Lavorare a maglia il pollice:
  • Passare i punti delle 2 spille di sicurezza sui 2 ferri sottili e riprendere 5 punti con un terzo ferro sottile.
  • Lavorare un giro distribuendo uniformemente le 18 maglie
  • Fare a maglia 6 giri “1 diritto, 1 rovescio”
  • Chiudere le maglie
  • Ricucire i fili
Posted on

​Handschuhe stricken (1)

Hier muss ich zwar noch etwas editieren, aber ich denke, es geht schon mal so. Im Moment habe ich sehr wenig Zeit, doch der Text musste online gehen.

​Das benötigst du

  • Nadeln zum Rundstricken: ein Nadelspiel (5 Nadeln), 4 bis 4,5 mm
  • Nadeln zum Aufnehmen von Maschen: ein Nadelspiel (4 oder 5 Nadeln), 2 bis 2,5 mm
  • Garn zum Stricken mit Nadeln von 4 bis 4,5 mm
  • Nähnadel
  • Schere

Wenn eine Beschreibung nicht klar ist, dann gib mir bitte Bescheid und ich werde sie dann entsprechend ändern. Wenn man ständig strickt, gibt es oft Schritte, die für erfahrene Strickerinnen und Stricker offensichtlich sind, die aber für andere gar nicht so offensichtlich sind. Das YouTube-Video ist unten eingebettet.

​Rechter Handschuh

  • 40 Maschen anschlagen (10 pro Nadel, 20 auf zwei Nadeln)
  • Maschen verteilen: 12 Maschen auf Nadel 1 und 3, 18 Maschen auf Nadel 2 und 4
  • 2 Maschen rechts, 2 Maschen links in der Runde stricken, bis Sie 34 Runden gestrickt haben
  • Die Maschen verteilen: 10 Maschen auf jeder Nadel
  • 17 Runden stricken (die Anzahl der Runden hängt davon ab, wie du deine Handschuhe magst)
  • An dieser Stelle beginnen wir mit den Zunahmen für den Daumens
  • Runde 1: erste Nadel: 1 M. (M=Masche) rechts stricken, 1 M. rechts stricken + Zunahme, 1 M. rechts stricken + Zunahme, Runde zu Ende stricken
  • Runde 2: erste Nadel: 1 M. rechts stricken, 1 M. rechts stricken + Zunahme, 2 M. rechts stricken, 1 M. rechts stricken + Zunahme, Runde zu Ende stricken
  • Runde 3: erste Nadel: 1 M. rechts stricken, 1 M. rechts stricken + Zunahme, 4 M. rechts stricken, 1 M. rechts stricken + Zunahme, Runde zu Ende stricken
  • Runde 4: erste Nadel: 1 M. rechts stricken, 1 M. rechts stricken + Zunahme, 6 M. rechts stricken, 1 M. rechts stricken + Zunahme, Runde zu Ende stricken
  • Runde 5: Runde ohne Zunahme stricken
  • Runde 6: erste Nadel: 1 M. rechts stricken, 1 M. rechts stricken + Zunahme, 8 M. rechts stricken, 1 M. rechts stricken + Zunahme, Runde zu Ende stricken
  • Runde 7: Runde ohne Zunahme stricken
  • Runde 8: erste Nadel: 1 M. rechts stricken, 1 M. rechts stricken + Zunahme, 10 M. rechts stricken, 1 M. rechts stricken + Zunahme, Runde zu Ende stricken
  • Runde 9: erste Nadel: 2 Maschen rechts stricken, die 13 Maschen von den Zunahmen auf zwei Sicherheitsnadeln verteilen, 1 Masche zunehmen, die Runde zu Ende stricken
  • Weiterstricken, bis 40 Runden ab Bündchen gestrickt sind
  • Maschen verteilen: 12 Maschen auf Nadel 1 und 3, 18 Maschen auf Nadel 2 und 4
  • 5 Runden, 2 Maschen rechts, 2 Maschen links, stricken
  • Abketten
  • Den Daumen stricken:
  • Die Maschen von den 2 Sicherheitsnadeln auf die 2 dünnen Nadeln übertragen und mit einer dritten dünnen Nadel 5 Maschen aufnehmen
  • Eine Runde stricken und dabei die 18 Maschen gleichmäßig verteilen
  • 6 Rd „1 M. re., 1 M. li.“ stricken
  • Abketten
  • Fäden vernähen

​Linker Handschuh

  • 40 Maschen anschlagen (10 pro Nadel, 20 auf zwei Nadeln)
  • Maschen verteilen: 12 Maschen auf Nadel 1 und 3, 18 Maschen auf Nadel 2 und 4
  • 2 Maschen rechts, 2 Maschen links in der Runde stricken, bis Sie 34 Runden gestrickt haben
  • Die Maschen verteilen: 10 Maschen auf jeder Nadel
  • 17 Runden stricken (die Anzahl der Runden hängt davon ab, wie du deine Handschuhe magst)
  • An dieser Stelle beginnen wir mit den Zunahmen für den Daumens
  • Runde 1: 1. Nadel rechts abstricken, 2. Nadel: 6 M. rechts stricken, 1 M. rechts stricken + Zunahme, 1 M. rechts stricken + Zunahme, Runde zu Ende stricken
  • Runde 2: 1. Nadel abstricken, 2.Nadel: 6 Maschen rechts stricken, 1 M. rechts stricken + Zunahme, 2 M. rechts stricken, 1 M. rechts stricken + Zunahme, Runde zu Ende stricken
  • Runde 3: 1. Nadel abstricken, 2. Nadel: 6 Maschen rechts stricken, 1 M. rechts stricken + Zunahme, 4 M. rechts stricken, 1 M. rechts stricken + Zunahme, Runde zu Ende stricken
  • Runde 4: 1. Nadel abstricken, 2. Nadel: 6 Maschen rechts stricken, 1 M. rechts stricken + Zunahme, 6 M. rechts stricken, 1 M. rechts stricken + Zunahme, Runde zu Ende stricken
  • Runde 5: Runde ohne Zunahme stricken
  • Runde 6: 1. Nadel abstricken, 2. Nadel: 6 Maschen rechts stricken, 1 M. rechts stricken + Zunahme, 8 M. rechts stricken, 1 M. rechts stricken + Zunahme, Runde zu Ende stricken
  • Runde 7: Runde ohne Zunahme stricken
  • Runde 8: 1. Nadel abstricken, 2. Nadel: 6 Maschen rechts stricken, 1 M. rechts stricken + Zunahme, 10 M. rechts stricken, 1 M. rechts stricken + Zunahme, Runde zu Ende stricken
  • Runde 9: 1. Nadel abstricken, zweite Nadel: 7 Maschen stricken, die 13 Maschen auf zwei Sicherheitsnadeln verteilen, 1 Masche zunehmen, die Runde zu Ende stricken
  • Weiterstricken, bis 40 Runden ab Bündchen gestrickt sind
  • Maschen verteilen: 12 Maschen auf Nadel 1 und 3, 18 Maschen auf Nadel 2 und 4
  • 5 Runden, 2 Maschen rechts, 2 Maschen links, stricken
  • Abketten
  • Den Daumen stricken:
  • Die Maschen von den 2 Sicherheitsnadeln auf die 2 dünnen Nadeln übertragen und mit einer dritten dünnen Nadel 5 Maschen aufnehmen
  • Eine Runde stricken und dabei die 18 Maschen gleichmäßig verteilen
  • 6 Rd „1 M. re., 1 M. li.“ stricken
  • Abketten
  • Fäden vernähen
Posted on

How to knit gloves (1)

What you need

  • Needles for knitting in the round: a set of 5 needles, 4 to 4,5 mm
  • Needles to take up stitches: a set of 4 needles, 2 to 2,5 mm
  • Yarn for knitting with 4 to 4,5 mm needles
  • Sewing needle
  • Scissors

If there is an instruction that is not clear, please let me know and I will improve the description. When you do knit all the time often there are obvious steps for the experienced knitter that are not obvious at all. The YouTube video is embedded below.

Right hand glove

  • Cast on 40 stitches (10 per needle, 20 on two needles)
  • Distribute the stitches: 12 stitches on needle 1 and 3, 18 Stitches on needle 2 and 4
  • knit 2, purl 2 in the round until you have completed 34 rounds
  • Distribute the stitches: 10 stitches on each needle
  • Knit 17 rounds (the amount of rounds here actually depends on how you like your gloves)
  • At this point we start with the increases of the thumb
  • Round 1: first needle: knit 1, knit 1 + increase, knit 1 + increase, finish knitting the round
  • Round 2: first needle: knit 1, knit 1 + increase, knit 2, knit 1 + increase, finish knitting the round
  • Round 3: first needle: knit 1, knit 1 + increase, knit 4, knit 1 + increase, finish knitting the round
  • Round 4: first needle: knit 1, knit 1 + increase, knit 6, knit 1 + increase, finish knitting the round
  • Round 5: knit this round without increases
  • Round 6: first needle: knit 1, knit 1 + increase, knit 8, knit 1 + increase, finish knitting the round
  • Round 7: knit this round without increases
  • Round 8: first needle: knit 1, knit 1 + increase, knit 10, knit 1 + increase, finish knitting the round
  • Round 9: first needle: knit 2, distribute the 13 stitches on two safety pins, increase 1, finish knitting the round
  • Go ahead knitting in the round until you have finished 40 rows starting from the rib
  • Distribute the stitches: 12 stitches on needle 1 and 3, 18 Stitches on needle 2 and 4
  • Knit 2, purl 2 for 5 rounds
  • Bind off
  • Knitting the thumb:
  • Pass the stitches from the 2 safety pins on the 2 thin needles and take up 5 stitches with a third thin needle
  • Knit one round distributing the 18 stitches evenly
  • Knit 6 rounds “knit 1, purl1”
  • Bind off
  • Weave in the ends

Left hand glove

  • Cast on 40 stitches (10 per needle, 20 on two needles)
  • Distribute the stitches: 12 stitches on needle 1 and 3, 18 Stitches on needle 2 and 4
  • knit 2, purl 2 in the round until you have completed 34 rounds
  • Distribute the stitches: 10 stitches on each needle
  • Knit 17 rounds (the amount of rounds here actually depends on how you like your gloves)
  • At this point we start with the increases of the thumb
  • Round 1: knit first needle, second needle: knit 6 stitches, knit 1 + increase, knit 1 + increase, finish knitting the round
  • Round 2: knit first needle, second needle: knit 6 stitches, knit 1 + increase, knit 2, knit 1 + increase, finish knitting the round
  • Round 3: knit first needle, second needle: knit 6 stitches, knit 1 + increase, knit 4, knit 1 + increase, finish knitting the round
  • Round 4: knit first needle, second needle: knit 6 stitches, knit 1 + increase, knit 6, knit 1 + increase, finish knitting the round
  • Round 5: knit this round without increases
  • Round 6: knit first needle, second needle: knit 6 stitches, knit 1 + increase, knit 8, knit 1 + increase, finish knitting the round
  • Round 7: knit this round without increases
  • Round 8: knit first needle, second needle:knit 6 stitches, knit 1 + increase, knit 10, knit 1 + increase, finish knitting the round
  • Round 9: knit first needle, second needle:knit 7 stitches, distribute the 13 stitches on two safety pins, increase 1, finish knitting the round
  • Go ahead knitting in the round until you have finished 40 rows starting from the rib
  • Distribute the stitches: 12 stitches on needle 1 and 3, 18 Stitches on needle 2 and 4
  • Knit 2, purl 2 for 5 rounds
  • Bind off
  • Knitting the thumb:
  • Pass the stitches from the 2 safety pins on the 2 thin needles and take up 5 stitches with a third thin needle
  • Knit one round distributing the 18 stitches evenly
  • Knit 6 rounds “knit 1, purl1”
  • Bind off
  • Weave in the ends
Posted on

Beans in 2022

2022 was a truly terrible year for beans. First it was too cold for a long time. Than they were finally in the soil and we had a very long dry and hot period that prevented them from growing, even if I watered them regularly. When they finally started to grow it was too late in the year and it was too cold for bees. I love beans so much. Let’s hope for a better year 2023.

Posted on

Bohnen 2022

2022 war ein wirklich schlimmes Jahr für Bohnen. Erst war es lange Zeit zu kalt. Dann waren sie endlich in der Erde und wir hatten eine sehr lange trockene und heiße Periode, die sie am Wachstum hinderte, auch wenn ich sie regelmäßig gegossen habe. Als sie dann endlich zu wachsen begannen, war es zu spät im Jahr und zu kalt für die Bienen. Ich mag Bohnen wirklich sehr. Hoffen wir auf ein besseres Jahr 2023.

Posted on

Fagioli 2022

Il 2022 è stato un anno davvero terribile per i fagioli. Prima ha fatto troppo freddo per molto tempo. Poi sono stati finalmente messi nel terreno e abbiamo avuto un lunghissimo periodo di caldo e siccità che ha impedito loro di crescere, anche se li ho annaffiati regolarmente. Quando finalmente hanno iniziato a crescere era troppo tardi ed era troppo freddo per le api. Mi piacciono molto i fagioli. Speriamo in un anno 2023 migliore.

Posted on

Medicina e la Scola Medica Salernitana

Attualmente si riscontrano continui problemi di consegna dei farmaci. Un articolo tedesco relativo a questo tema:

https://www.welt.de/wirtschaft/article242220703/Pharmahersteller-Lieferengpaesse-bei-Medikamenten-nehmen-weiter-zu.html

È tempo di consultare Madre Natura. Purtroppo molte conoscenze sulla nostra vecchia medicina naturale sono andate perdute. Naturalmente dovremmo cercare di ritrovare le informazioni.

Un documento molto interessante proviene dalla Schola Medica Salernitana, che ha dato il via all’inizio della medicina moderna con le erbe (all’epoca moderne) in Europa
https://it.wikipedia.org/wiki/Scuola_medica_salernitana
Tuttavia, sarei interessato ai metodi di guarigione dei Celti, perché utilizzavano le erbe che crescono nel nostro Paese (nord dell’Europa). La Scola Medica Salernitana è un punto di partenza. Tra l’altro, le conoscenze di Hildegard von Bingen si basavano proprio su questa “scuola”.

L’immagine è nel pubblico dominio

Posted on

Medicine and the Schola Medica Salernitana

Again and again, there are currently delivery problems with drugs. A German article re. this topic:

https://www.welt.de/wirtschaft/article242220703/Pharmahersteller-Lieferengpaesse-bei-Medikamenten-nehmen-weiter-zu.html

It is time to consult Mother Nature. Unfortunately, much knowledge about our old natural medicine has been lost. Of course we should try to find the information again.

A very interesting document comes from the Schola Medica Salernitana, which initiated the beginning of modern medicine with herbs (modern at that time) in Europe
https://en.wikipedia.org/wiki/Schola_Medica_Salernitana
However, I would be interested in the healing methods of the Celts, because they used the herbs growing in our country (welll in Europe). The Scola Medica Salernitana is a place where to start. By the way, Hildegard von Bingen’s knowledge was based precisely on this “school”.

Picture in the public domain.